New clients can be created from:
- From the All Client list
- From the My Clients list
- When creating an appointment
Creating a Client from All Clients or My Clients
A new client can be created from both the All Client or the My Clients pages. The difference is that only admins will be able to view the All Clients page while providers will only have access to My Clients.
- Navigate to My Clients or All Clientfrom the left navigation bar
- Click on New Client
- Fill in the necessary details (more information later in the article here)
- Click Create Client
Creating a Client from a New Appointment
- Follow the steps outlined here to add a new appointment
- Under the Add Users heading click on New Client
- Fill in the necessary details (more information later in the article here)
- Click Create Client
Create a Client Window
Basic Settings
- Type the client's first name.
- Enter the client's middle name
- Type the client's last name.
- Select the client's preferred language.
- Select the client's timezone.
- Enter the client's email address.
-
Email Communication consent is selected by default.
Note: Clients will need this checked in order to receive their appointment links and access codes by email. - Enter the client's mobile number.
- If applicable, select SMS Communication if the client would like to receive notifications by SMS.
Note: If you do not want to add a client's mobile number, uncheck SMS Communication and leave the mobile field blank.
- Select Primary if the entered mobile number is the client's Primary Number.
- Click “Create Client”.
If you have Client Portal enabled an email will be sent to the user to claim their account which is valid for 72 hours. As well, leaving the mobile number blank will result in an error.
Advanced Client Settings
You can add more information to a client's profile than the Basic fields. Each section can be expanded by clicking the arrow to the right of the section name
Client Details
Expand the Client Details section to add more client demographic information such as:
- Date of birth
- Personal Pronouns
- Address
- Select the client's salutation.
- Select or manually enter the client's sex assigned at birth
- Select the client's personal pronouns.
- Select the client's date of birth.
- Select Voice Communication Consent to indicate the client consents to receiving voice notifications (if enabled)
- Enter the client's address.
- Enter the client's apt/suite/floor if applicable
- Select the client's referring provider, if applicable
- Select if the client is qualified, if applicable
- Type the client Veteran ID, if applicable.
- Select the location the client will be treated.
- Type in a client alert that other users will see on the client's Profile and their Appointment Details.
Contact Information
- Add additional client contact numbers.
- Add a client's emergency contact information.
Coverage and Insurance
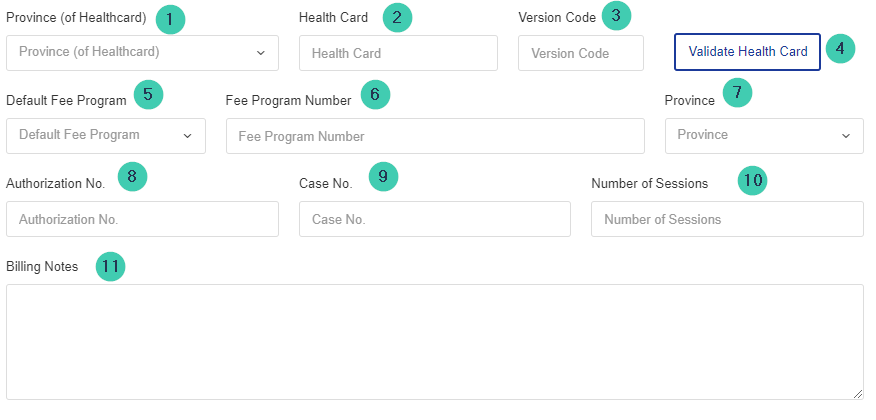
- Add the province where the client's health card was issued
- Enter the client's health card information.
- Enter the client's health card version number
- Validate the client's health card information
- Enter the client's default fee program, applicable if you are using advanced billing
- Add a fee program number, if applicable
- Enter the client's province
- Add a billing authorization number, if applicable
- Add a case no., if applicable
- Enter the number of sessions the client will need, if applicable
- Add any required billing notes